If you’re looking for one of the mos iconic trails in Tenerife, the Roques de Garcia Hike should be at the top of your list. Located in the otherworldly landscape of Teide National Park, this loop trail offers jaw-dropping views, ancient lava formations, and a surreal backdrop dominated by Spain’s highest peak, Mount Teide. It’s a relatively easy hike that packs in a ton of visual drama without demanding too much in terms of stamina. This makes it perfect for both casual walkers and seasoned hikers looking to soak in some of the island’s most dramatic scenery.
From the moment you step onto the trail, you’ll feel like you have landed on another planet. Towering rock spires, twisted lava flows, and panoramic views that stretch out in every direction. In this blog, I’ll walk you through everything you need to know: how to get there, what to bring, and why this short but unforgettable loop deserves a spot on your Tenerife itinerary.
TABLE OF CONTENTS
INTERESTING FACTS ABOUT ROQUES DE GARCÍA
Roques de Garcia is the most popular hike in Tenerife, and it is not difficult to figure out why. However, most people visit this place and just take some photos and leave. Here are some interesting facts about this stunning place that you can find in Teide National Park.
The rock formations at Roques de García are the results of millions of years of volcanic activity and erosion. The look as part of a decor for a sci-fi movie but they are in fact, natural sculptures!
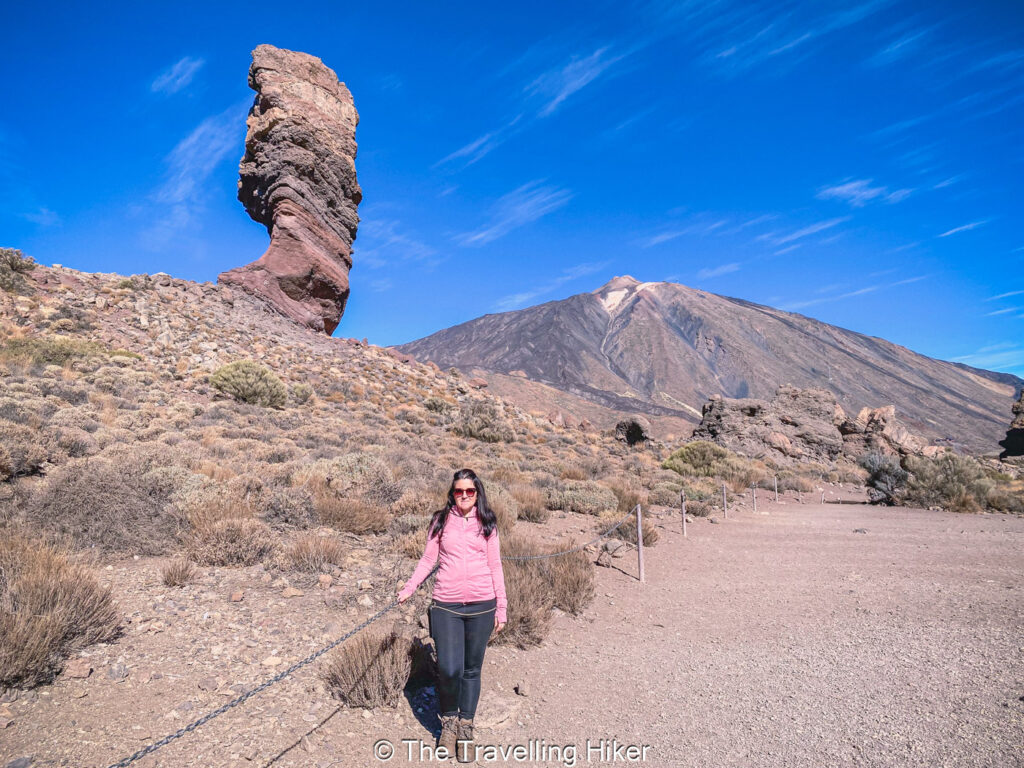
This place is one of the Most Photographed Spots in Tenerife, in particular the famous “Roque Chinchado” (also called the “Finger of God”).
It is a UNESCO World Heritage Site. The whole Teide National Park was declared a UNESCO site in 2007 for its incredible volcanic landscapes and biodiversity.
And speaking of biodiversity, along the hike you will find several botanical surprises. Despite the arid look, you’ll find plenty of hardy plant life like the Red Bugloss (Tajinaste Rojo in Spanish) which is an endemic species of the Canary Islands.
PRACTICAL INFORMATION ABOUT THE HIKE
Want to enjoy this hike? Then this practical information is just what you need to know to plan your visit. In this section we will talk about how to reach the trailhead, the equipment that you will need, the best moment to do this hike and much more.
HOW DO YOU REACH THE TRAILHEAD?
Roques de García is located within Teide National Park, very close to the cable car that will take you to the top of Teide. Here are the different ways you can reach it.
🚗By Car
The easiest and fastest way to reach the trailhead is by renting a car and driving there. Just search on your GPS Roques de García (coordinates 28.223175, -16.630683). The driving times will depend on where you’re driving from.
From Santa Cruz de Tenerife it will take approximately 1 hour and 18 minutes.
From Puerto de la Cruz it will take 1 hour and 10 minutes.
From the southern coast it will take approximately 1 hour.
If you don’t feel comfortable driving, it is also possible to reach this hike with the island’s public transport. It will just take longer to reach the trail head.
From Puerto de la Cruz, take bus 348 until the stop Parador del Teide.
From Los Cristianos, take bus number 342 until the stop Parador del Teide.
💡 All of the above seems too complicated? You can also join a guided tour to Roques de García. All you will have to do is show up at the pick-up location and enjoy this beautiful place.
EQUIPMENT NEEDED
Even though this trail is not too complicated, here is a quick list of what you will need for a comfortable and safe hike around Roques de García.
Sturdy walking shoes or hiking boots. The trail is rocky and uneven in places, so good grip is key.
Layered clothing. Don’t forget you will be over 2,000 meters above sea level. Bring a light jacket with you (just in case).
Sunscreen and a hat to protect you from the sun. The sun is quite strong at high altitude, and there is not much shade.
Plenty of water in a reusable bottle. Hydration is key when hiking and there are no facilities around.
Camera or phone. You’ll definitely want to capture the views!
Optional but nice to have: Backpack with some snacks to have small picnic along the trail. If you do this, always pack out what you brought. Help protect the environment by practicing the 7 principles of leave no trace.
BEST TIME TO DO THIS HIKE
The best time to do the Roques de Garcia Hike in Teide National park is either in Spring (March to June) or Autumn (September to November). These seasons offer the most favorable conditions for hiking.
Mild Temperatures. You will be avoiding the warm summer temperatures. Keep in mind that there is almost no shade on this trail.
Fewer crowds. Even though the Canary Islands receive tourism all year long, during the spring and autumn months you’ll encounter fewer people on the trail. However, don’t expect miracles, this trail is probably the most hiked trail in Tenerife.
In Spring, you will be able to admire the Red Bugloss in full bloom which will add a beautiful pop of red to the area.
Even if you’re hiking in these months, always check the weather forecast before starting your hike. Conditions at high altitudes can change rapidly.
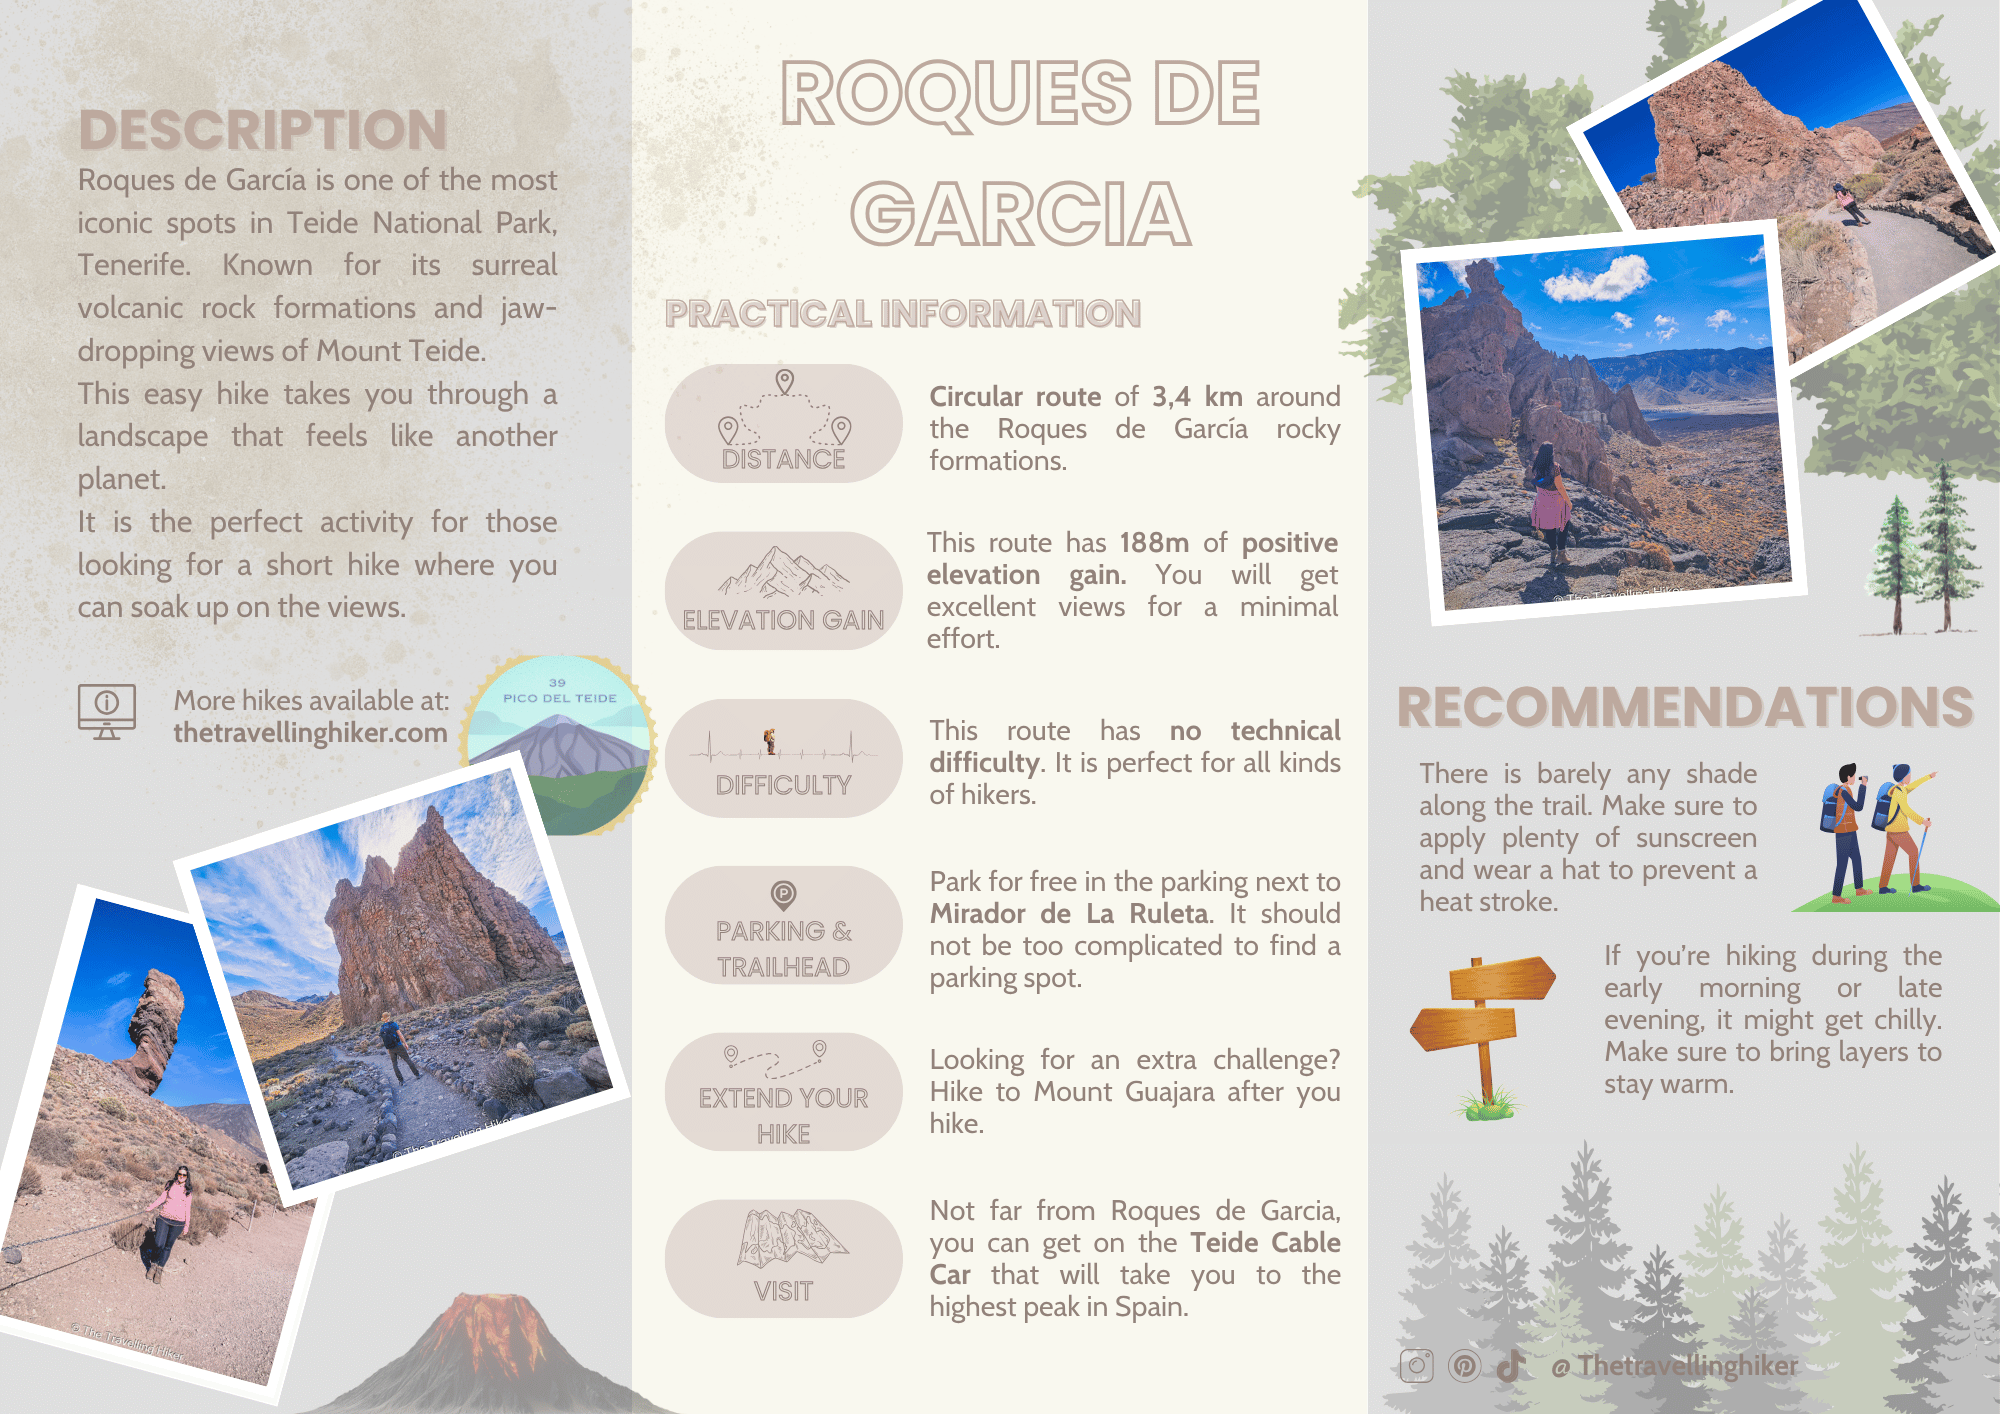
ROQUES DE GARCIA HIKE
HIKE STATS
Trail Start/End – Mirador de la Ruleta Parking
Distance – 3,4 km
Elevation Gain – 188 m
Level – Easy to Moderate
Route Type – Circular Route
Estimated Time Needed – 2 to 3 hours. You will want to stop every few meters to enjoy the views and take plenty of photos.
Best Time To Visit – Spring or Fall, to get the most favorable weather conditions and fewer crowds.
HIKE MAP
I always use the AllTrails App during my hikes. The app has a GPX map that can help you stay on the right trail during your hikes. For this hike, we followed the Roques de García hiking route.
ROQUES DE GARCIA HIKE - STEP BY STEP GUIDE
Mirador de la Ruleta Viewpoint
The hike starts next to the Mirador de la Ruleta parking lot. At the end of the parking lot, you’ll see a paved path and some signs that will show the way to the trail. Before you start the trail, you can go a short uphill to Mirador de la Ruleta which is a great viewpoint on the valley. However, if you’re going to do the complete trail (not just the paved area) this is not really necessary as you will get the same views later on the trail.
🅿 Parking: This parking lot is very busy and chances are that, if you arrive during the middle of the day, it will be full. However, do not dispair, there are many people that just get here to check-out the viewpoints and leave. Keep driving around both this parking lot and the Parador Hotel parking lot and you will eventually find a parking spot. We had to drive around for 15 minutes until we found someone leaving.
Roque Chinchado and Teide Views
The first part of the trail is through a very well-maintained path that is almost paved and very accessible. This makes it a very crowded area and there is constant people around you. Just be patient, most of this people will just stop take a photo and leave.
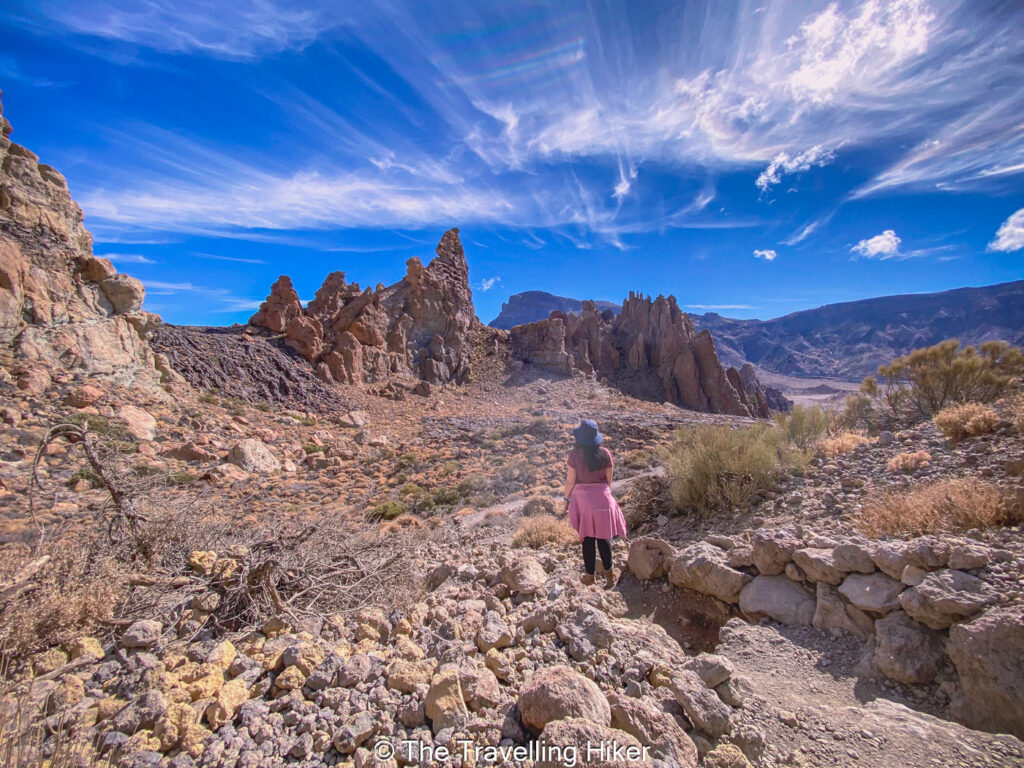
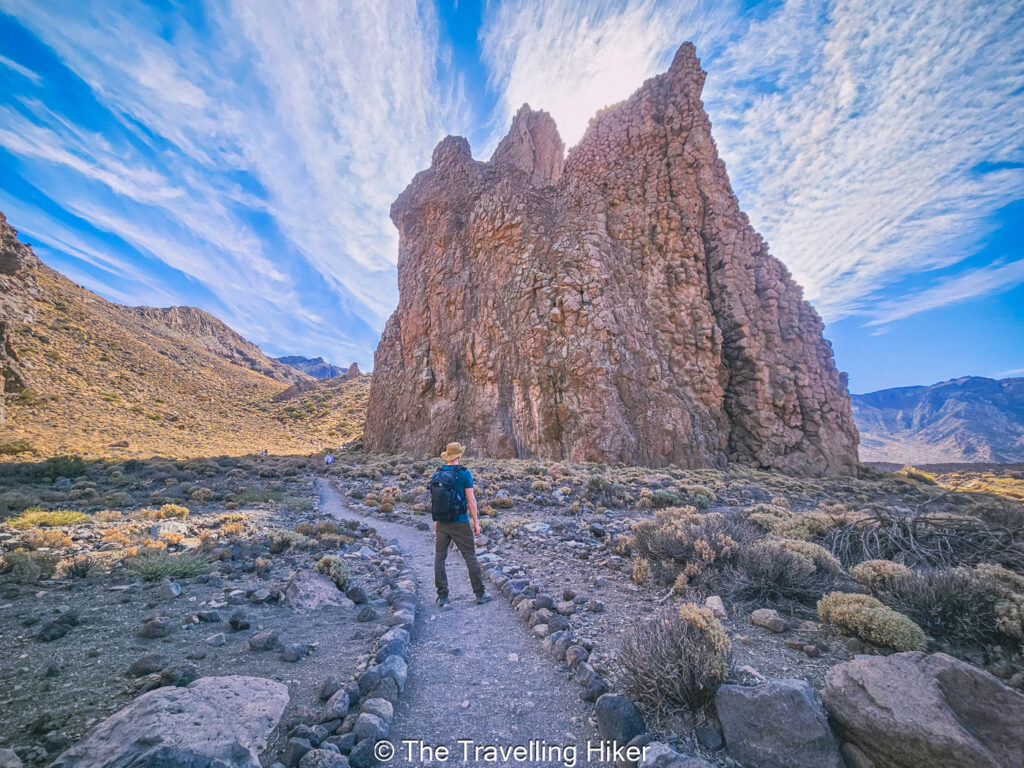
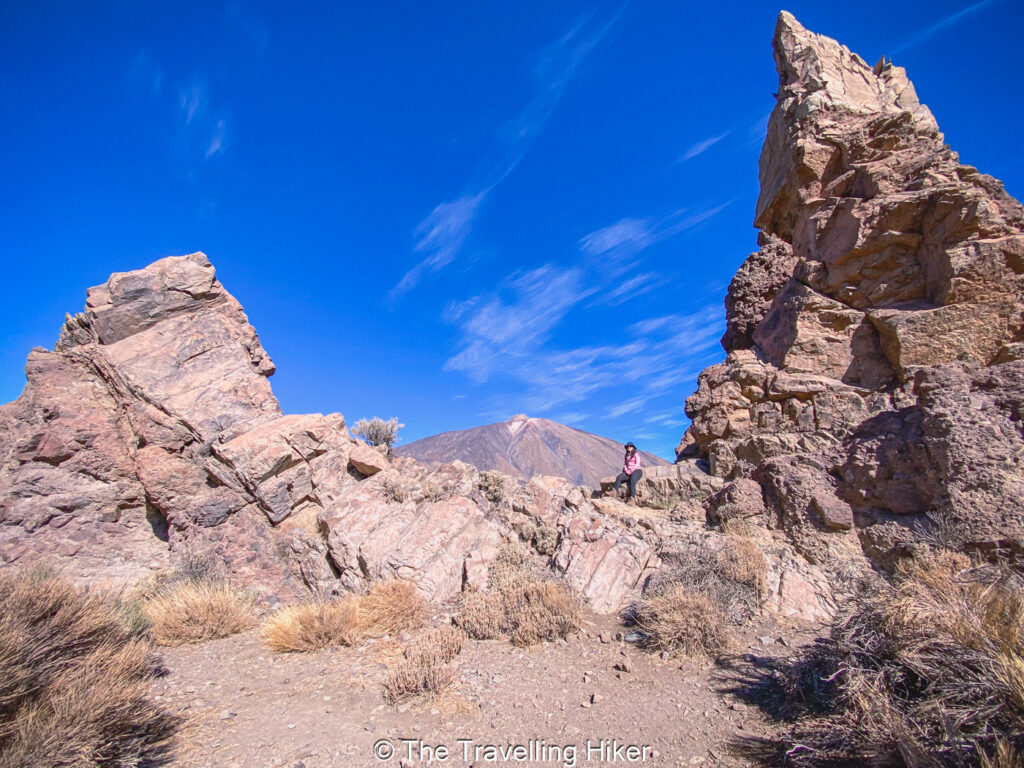
On your left, you will see the famous Roque Chinchado, the twisted rock pinnacle that is also called “God’s Finger”. On your right, Mount Teide will be towering over you. It doesn’t get more impressive than this.
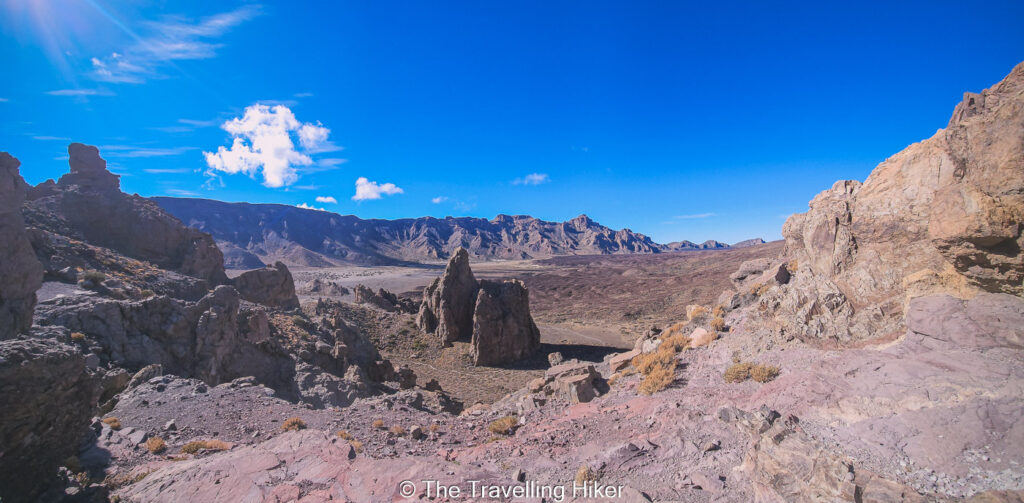
If you walk a bit further, the rock formations (los Roques in Spanish) will open up giving you a first glance into the valley. The views are just jaw-dropping, and you will feel like you have landed in a different and arid planet.
In this first part of the trail you will also find several signs that give you interesting information about the area you are visiting such as the different rock formations and the types of lava that formed it.
The Descent Into The Valley
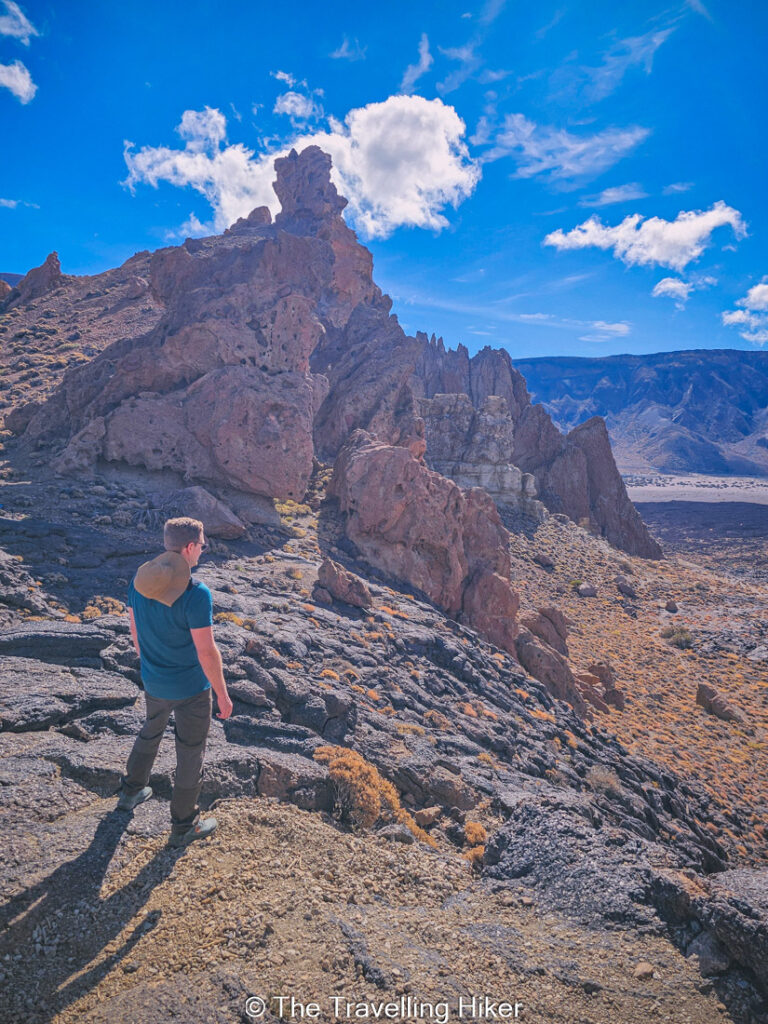
After approximately 1 km, the real trail begins and you will need hiking shoes with a good grip. Most people will turn around at this point, and even though you will not be alone, the crowds will definitely thin out.
The trail will continue to border the rock formations and you will get your last views of Teide before you start to descend into the valley. This area was definitely my favorite part. There was barely anyone on the trail and every spot was so photogenic!
The Valley And The Hike Back To The Parking Lot
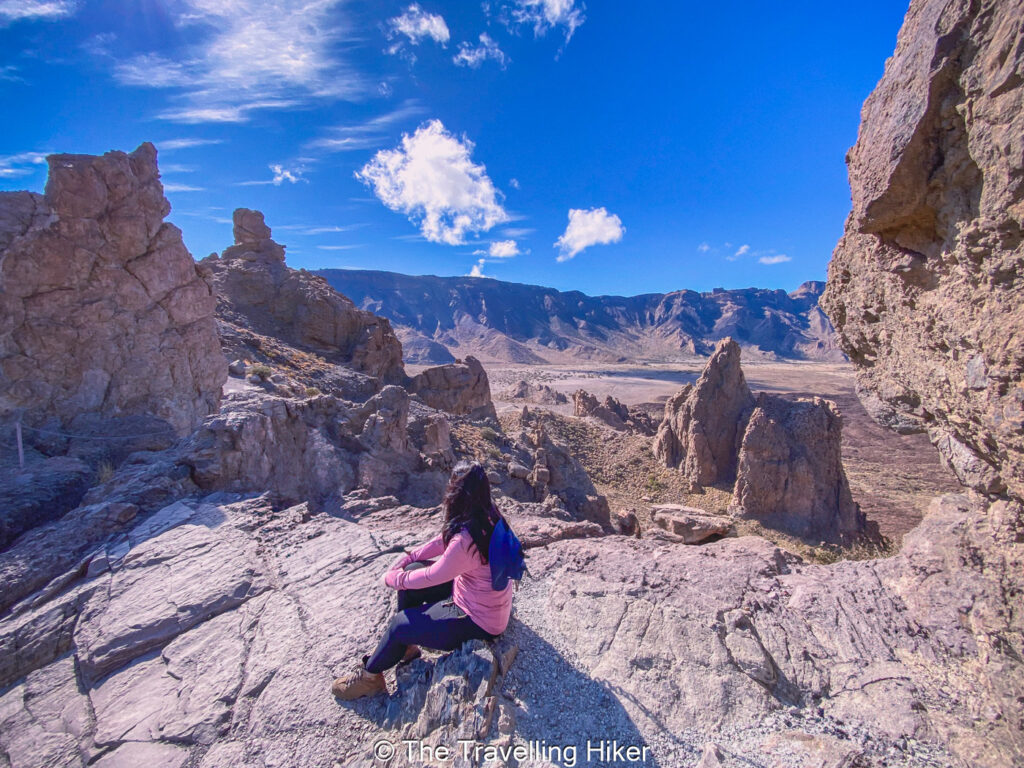
Once at the valley,you just walk on the other side of the rocky formations. In front of you, you will see the last Roque which is called “The Cathedral” and it is quite impressive. We were enjoying this hike so much that we decided to sit down and enjoy the views while we had a little snack.
Once you’re done admiring the views it is time hike back up to the parking lot. Even though this ascent is not technically difficult at all (there are stairs), it is quite steep so just take it slow and take as many breaks as you need. While doing so, don’t forget to turn around and enjoy a last view of the area.
OTHER THINGS TO DO NEAR ROQUES DE GARCIA
Looking for ideas on what to do after your hike? Here’s what I would recommend you do.
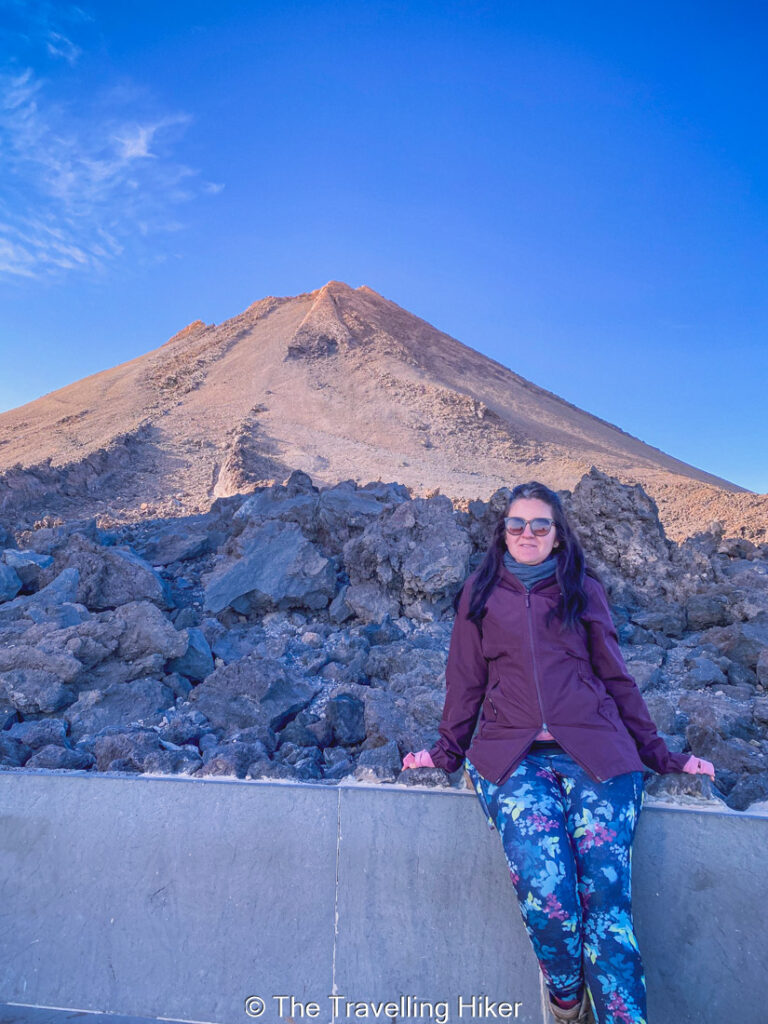
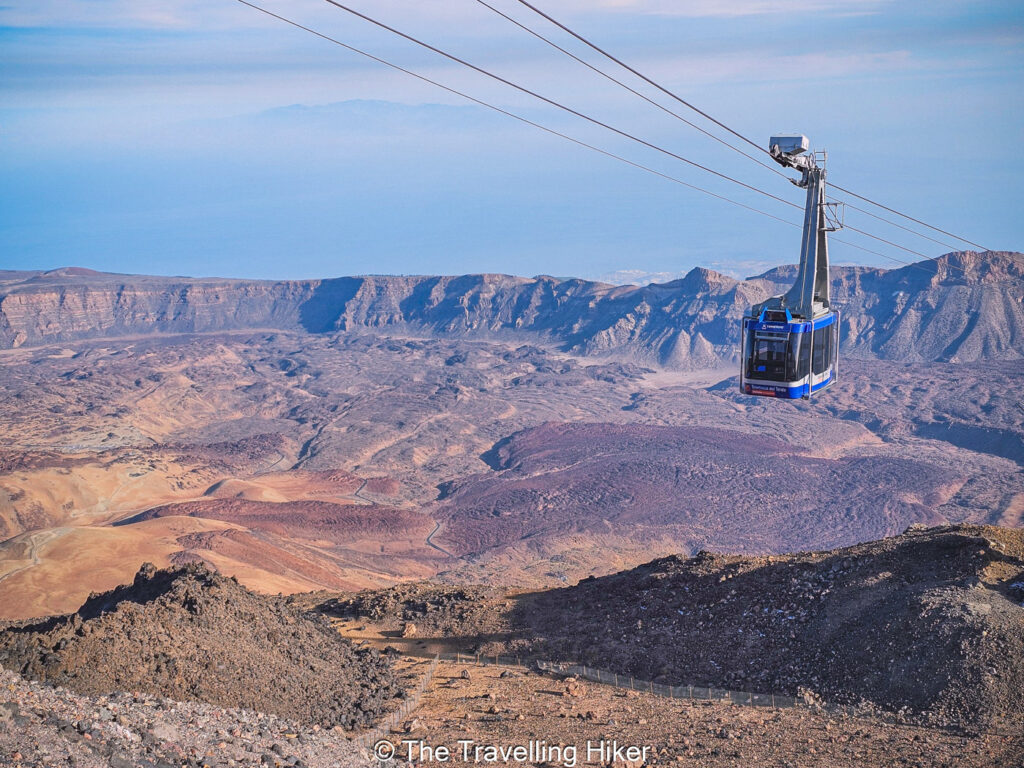
Take the Teide Cable Car and visit Pico del Teide, the highest peak in Spain. The cable car will bring you almost to the peak but if you want to hike up to Pico del Teide, you will need to get a permit. You can get it for free on this website but they tend to run out really fast. Also, don’t forget to book your Teide Cable Car tickets in advance to avoid having to wait in line.
Visit Minas de San Jose, a former open aire pumice stone mining area where you can also get impressive views of Mount Teide.
ACCOMMODATION NEAR THE HIKE
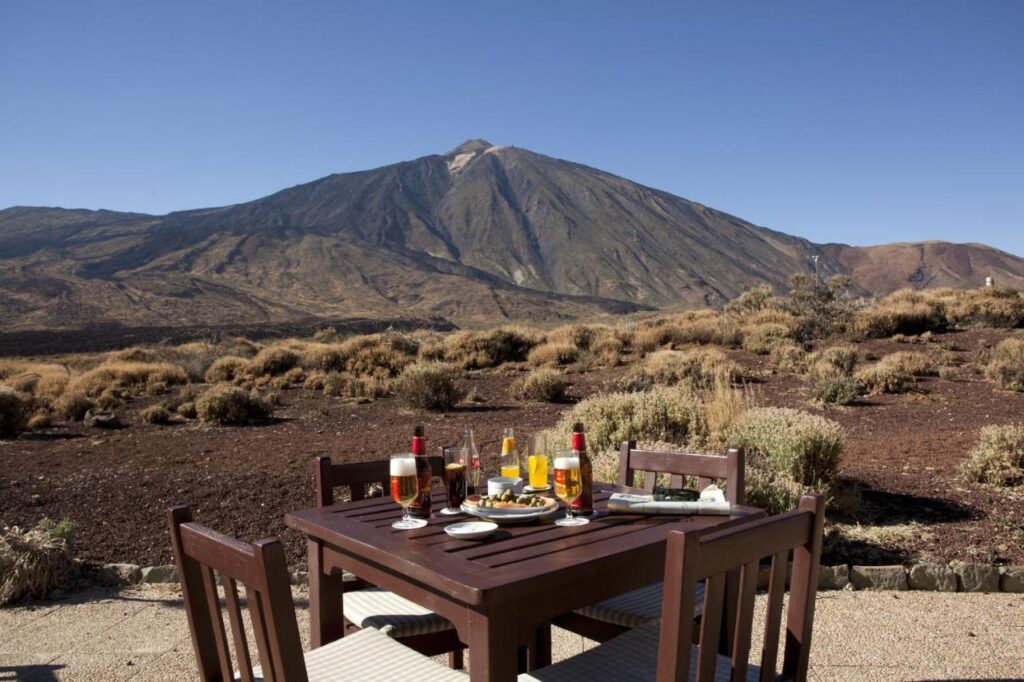
Looking for a comfortable and unique accommodation near this hike? Then you have to spend the night at Parador de las Cañadas del Teide. This hotel has an unbeatable location just accross the road from this hike. This makes it the perfect place to set base while you explore Teide National Park.
Nothing will beat seeing sunrise or sunset with views of Teide!
HOW TO USE THIS MAP: Click the star next to the map title to add this map to your google maps account. To view it on your phone while traveling, open Google Maps, click on the menu button and go to “Your Places”, click on Maps and you’ll see this map in your list.
HIKE SUMMARY AND INFOGRAPHIC
No time to read the full blog post? Here’s an infographic I’ve created with the most important information about this hike.
And that’s it for this week’s blog. I hope you liked it and found it useful. Let me know what you think in the comments!
Happy hiking!
DISCLAIMER: Did you know? This blog uses affiliate partnerships. When you click and book or make a purchase through one of my blog posts, I may receive a small commission (at no extra cost to you). Thank you for supporting The Travelling Hiker!